


Blur Video and Photo Editor
Blur Video and Photo Editor का विवरण
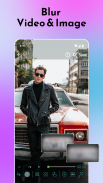
वीडियो और फ़ोटो संपादक को धुंधला करें आपको फ़ोन गैलरी आइटम या कैमरे का उपयोग करके कैप्चर किए गए मीडिया पर वीडियो और छवियों पर धुंधले प्रभाव लागू करने की अनुमति देता है। शानदार सुविधाओं के साथ शक्तिशाली वीडियो संपादन टूल! मैं
शानदार धुंधला फ़ोटो संपादक
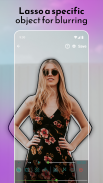
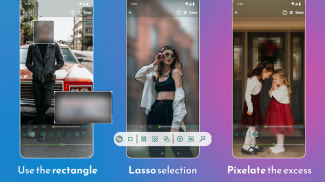
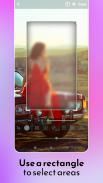
यह धुंधला वीडियो संपादक पिक्सेलेटिंग चेहरों या अन्य अवांछित वस्तुओं और वीडियो के क्षेत्रों के संबंध में आपकी सभी वीडियो संपादन आवश्यकताओं का उत्तर देता है। आप आयतों या कस्टम आकृतियों का उपयोग करके धुंधला/पिक्सेल करने के लिए 1 से अधिक क्षेत्र को परिभाषित कर सकते हैं (अपनी उंगली का उपयोग करके / लास्सो का चयन करें)। मैं
🥇 जांचें कि यह Android के लिए नंबर एक वीडियो ब्लर संपादक क्यों है! 🥇
पृष्ठभूमि को आसानी से धुंधला करें!
आप चयनित या अचयनित क्षेत्रों को धुंधला करने के विकल्प के साथ, ब्लर फ़िल्टर की तीव्रता को समायोजित करने के लिए पृष्ठभूमि को धुंधला कर सकते हैं और प्रत्येक क्षेत्र की अवधि को परिभाषित कर सकते हैं।
ब्लर वीडियो और फोटो एडिटर की शानदार विशेषताएं:
✅ विशिष्ट वस्तु को ट्रैक करें और उस पर धुंधला प्रभाव लागू करें
चलती वस्तु पर धुंधला प्रभाव लागू करें
✅ फोटो या वीडियो की पृष्ठभूमि को धुंधला करें
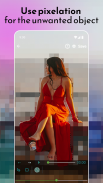
✅ छवि / वीडियो के अवांछित भागों को प्रभावी ढंग से पिक्सेलेट करें
✅ फ़ोटो या वीडियो को धुंधला करने के लिए आयतों या कस्टम आकृतियों का उपयोग करें
एक PRO की तरह धुंधले चेहरे
✅ सरल और सहज ऐप यूआई
✅ सबसे सम्मोहक ब्लर फोटो और वीडियो संपादक
कलंक फ़ोटो और वीडियो संपादक का उपयोग कैसे करें?
✔ जैसे ही आप ऐप शुरू करते हैं, यह आपको एक छवि या वीडियो चुनने का विकल्प दिखाता है
✔ गैलरी से चयन करें या एक नया कैप्चर करें
✔ क्षेत्र को धुंधला करने के लिए परिभाषित करें, या एक समायोज्य आयत क्षेत्र का उपयोग करें,
✔ हां, इतना आसान!
पेशेवर वीडियो और फ़ोटो संपादन टूल के उन्नत विकल्पों का आसानी से उपयोग करें:
⭐ ऑब्जेक्ट ट्रैकिंग सक्षम करें - ऑब्जेक्ट क्षेत्र को दो सरल चरणों में परिभाषित करें!
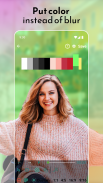
फ़ोटो और वीडियो को धुंधला करने के लिए धुंधले प्रभाव के बजाय रंगों का उपयोग करें!
धुंधला करने के लिए एक से अधिक क्षेत्र निर्दिष्ट करें!
एक प्रो की तरह ब्लर वीडियो बैकग्राउंड!
फ़ोटो और वीडियो पर चेहरे को धुंधला करें!
⭐ वस्तुओं को छिपाने के लिए धुंधला, पिक्सेलेट और रंग के बीच चयन करें!
फ़ोटो/वीडियो के चयनित या अचयनित क्षेत्र पर धुंधला प्रभाव जोड़ें!
बॉटम बार में हैंड फिगर पर क्लिक करके जूम एरिया।
प्रसंस्करण गति बढ़ाएँ!
धुंधला क्षेत्र की अवधि निर्दिष्ट करें
पहलू राशन बदलें
🌟 वीडियो और फ़ोटो संपादक टूल को धुंधला करें - हमारे उपयोगकर्ताओं द्वारा एक स्पष्ट निष्कर्ष 🌟
संक्षेप में, ब्लर वीडियो और फोटो ऐप सबसे अच्छा वीडियो संपादक है। ऐप डाउनलोड करें और अपनी पसंदीदा सामग्री को संपादित करके लाभ लेना शुरू करें। ब्लर फोटो एडिटर का उपयोग करें और अपनी सामग्री को आसानी से संपादित करें।
🌟 संभावनाओं को एक्सप्लोर करें और खोजें
मान लीजिए आप अपनी गोपनीयता, दुकान, कार, दस्तावेज़ आदि की रक्षा करना चाहते हैं। आप इसे ब्लर फोटो और वीडियो एडिटर ऐप की मदद से कर सकते हैं। आप चेहरे, व्यक्तिगत वीडियो, मजेदार सामग्री, टिक टोक वीडियो, यूट्यूब वीडियो, कोई भी एचडी व्लॉग, अपना व्लॉग, या कोई भी आवश्यक वीडियो धुंधला कर सकते हैं।
PRO की तरह एक अद्भुत ब्लर बैकग्राउंड इफ़ेक्ट बनाएं!
चेहरे को धुंधला करने या कम से कम समय में किसी भी वांछित हिस्से को पिक्सेलेट करने के लिए उच्चतम उपयोगिता टूल की खोज करें। मैं
Blur Video and Photo Editor - Version 4.9.7
(01-06-2024)Blur Video and Photo Editor - एपीके जानकारी
एपीके संस्करण: 4.9.7पैकेज: com.bongasoft.blurimagevideoLatest Version of Blur Video and Photo Editor
अन्य संस्करण


Apps in the same category
 4.22
4.22 4.44.394.194.02
You may also like...


